|
|
|
|
|
|
| Bulbs
by Arlene Correll 07-29-03 |
 |
To paraphrase a sentence, "When an old gardener's thoughts turn to bulbs, can Fall be far behind?" Even though August is just coming into being, my thoughts all this week are on tulip bulbs and practically every other kind of bulb. To say nothing of Rhizomes. i.e. Iris, etc. I not only sit with all the catalogs that we are being deluged with for the past 8 weeks, I try to find some extra dollars in our meager budget for the purchase of said bulbs. I practically have to consider myself a bulb "junkie" when it comes to the Asiatic Lilies and Oriental Lilies. There |
| always seems to be something I do not have and feel I must have. I find myself pitching out the catalogs right in the post office trash barrel. But then I turn around and dig them right back out and take them home and drool over them. |
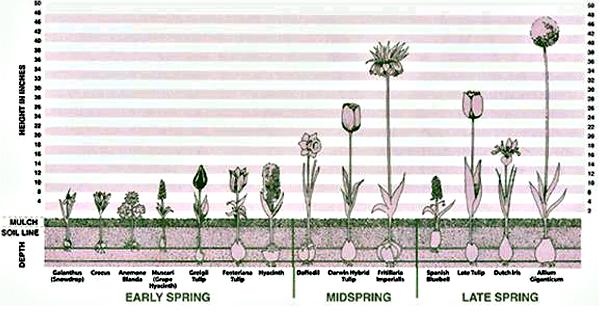
| Different parts of the garden are total rewards onto themselves. Spring bulbs are no different. This late winter was the first time we were ever here and were able to be mystified, stupefied, awed, amazed, and delighted, daily, with all the different things I had planted in the previous falls, but never saw until we came home in early April, when by that time, the only thing left was the stalk and leaves. I made a vow this past spring, that since there are so few springs left in my life, that I would not miss a one here at Home Farm. Here is a copy of a bulb chart I found on the internet. |
 |
|
Most of what I say pertains to any kind of bulb. However, I found some interesting information about tulips on the web. “Tulips
are classified as a perennial flower. This means that a tulip should be
expected to return and bloom year after year. But we all know that this
is not always the case. If tulips are perennials, then why don't they
behave as perennials? The
answer is really quite simple. Tulips are native to Eastern Turkey and
the foothills of the Himalayas. They will perennialize best in
conditions that match the cold winters and hot, dry summers of their
native region. In addition, species and botanical tulips perennialize
best. Hybridizing sometimes diminishes
a tulip's ability to perennialize, other times it enhances this ability. Growers have been able to succeed in places like Holland and the Skagit Valley by digging their tulips every year and giving them temperature treatments in the summer months that manipulate the tulips and somewhat replicate what they would be receiving in their native region. These treatments have been developed over hundreds of years and they are still being modified today as new varieties are being developed. Using this knowledge helps growers to expand their stocks and grow big bulbs, while the home gardener may have less success." |
|
I would like to share some gardening information regarding bulbs for those of you who are interested. For best depths and spacing, always follow the instructions that come with your bulbs. For uniform planting holes, use a bulb planter. I have a long handle one for special jobs as my old knees are getting bad. I am lazy and I have a tendency to be the cardboard gardener. For old beds, I just lay my old bulbs on the raised bed and then dump some new sacks of top soil on top of them. This gives me two or 3 levels of bulbs and allows me to have a longer blossom time for our area. Plus I always plant 3 types of bulbs. Early spring, Medium spring and late spring. For new beds, I just put down enough cardboard right on the grass where I want the new raised bed to be. I make it the shape I want it to be. Then put a layer of bagged topsoil on, lay the bulbs on top of the dirt. Never like little soldiers in a line, but in circular groups of colors and fill in the circle. Remember plant them twice as deep as the bulb is high. They have no roots at this stage. Then throw another bag of topsoil on the bulbs, water well, then about 3 inches of mulch and water really well. Our kids know us so well, that Christmas, Mother's day and birthdays are usually gift cards to places that have garden centers. I love it. Most
bulbs, and we prefer Dutch Bulbs, grow well in any average garden soil
with good drainage. It is desirable, however, to break up heavy soils
before planting. (See! Here
is another good reason to follow my directions above!)
Before covering our bulbs in their planting hole, I sprinkle some
of my favorite bulb food, Bulbs Alive, but you can use any bulb booster.
The directions recommend on the Bulbs Alive box is 1/2 cup per
bulb in the hole. Too
expensive for me! So I put about 2 tablespoons in with each bulb.
After planting, I give our bulbs a deep watering and then let
Mother Nature do her job, unless it is dry, then the sprinklers take
over. Since we seem to enjoy average weather conditions and it seems to
provide enough moisture for our bulbs. However, if the weather is
unusually hot and dry, a weekly deep soaking will produce larger,
longer-lasting blooms. (A general rule of thumb is that all plants need
an inch of water each week.) We
never have enough compost to use as mulch and short of going into the
village to knock on doors and asking for leaves in the fall, we use a
cheap cypress commercial mulch on our bulbs and other flowers by keeping
the soil from drying out, maintaining a more even soil temperature and
reducing weed growth. It also prevents soil from splashing onto the
flowers and foliage.
Dutch
Bulbs are winter hardy, even at extreme temperatures. However, we mulch
them lightly, especially the first winter after planting. Some people
use Evergreen boughs, pine needles or leaves as mulch.
Again we do not have any of these, so we indulge ourselves again
with commercial mulch. This
provides good protection in areas where there is alternate freezing and
thawing, which may have a tendency to displace bulbs from their planted
positions. Winter mulch should not be put down until ground has frozen
hard. Snow is a natural, and ideal, final covering. We remove winter
mulch early in the spring, before bulbs begin growing and we set the
mulch aside to recycle again in other areas or in the same area in the
fall. We just make a big
pile of it in an out of the way area.
|
 |
|
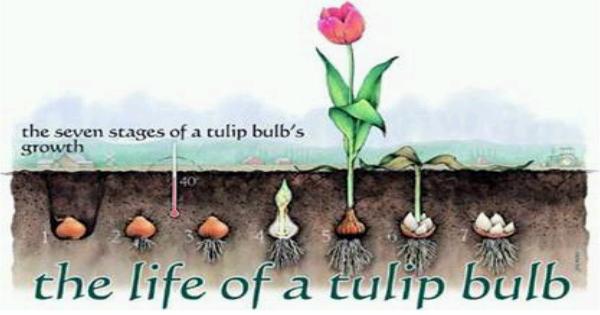
1.
Sept.- Oct. |
|
2.
November |
|
3.
Dec. - Jan. |
|
4.
Feb. - March |
|
5.
April - May |
|
6.
May - June |
|
7.
July - Sept. |
|
ã copyright 1996 – 2004 www.learn-america.com All rights reserved. |